

Table of Contents
What is Concrete slump test
Concrete slump test is very important test, carried out on site to find out the workability of concrete. Purpose of slump testing is to find out Water Cement Ratio of concrete and its workability that is very important in mixing, transporting, placing and compacting of concrete.
Required Equipment for slump testing:
- Slump cone
- Tamping rod
- Tamping rod stand
- Measuring tape or ruler
Slump test procedure:
- Preparation
In slump test procedure this is the 1st activity that all equipment should be clean and inside of cone and other equipment should be moisten with oil.
- Setting of slump cone
Place the slump cone on a level, rigid surface with the base on the ground. Protect the slump cone with the tamping rod stand to avoid movement.
- Slump Cone Filling with concrete
Slump cone should be filled with three layers, one layer equal to one-third of the cone's height. Each layer should be compacted by rodding with 25 strokes with the tamping rod, ensuring uniform distribution and compaction.
- Removal of Excessive Concrete
After filling of cone with the final layer, excess concrete should be removed using the tamping rod or a trowel.
- Lifting up the Slump Cone
Lift up the slump cone vertically without any twisting or tilting motion. Do it smoothly and steadily to avoid disturbing the concrete.
- Measuring the Slump with measurement tape
Measure the difference between the height of the slump cone and the top of concrete. This difference is called the "slump," and it is measured in millimeters.
Precautions during slump testing:
During slump testing, ensure all equipment should be clean and inside of cone and other equipment should be moisten with oil. Clean all the equipment immediately after testing to avoid the concrete hardening on the tools.
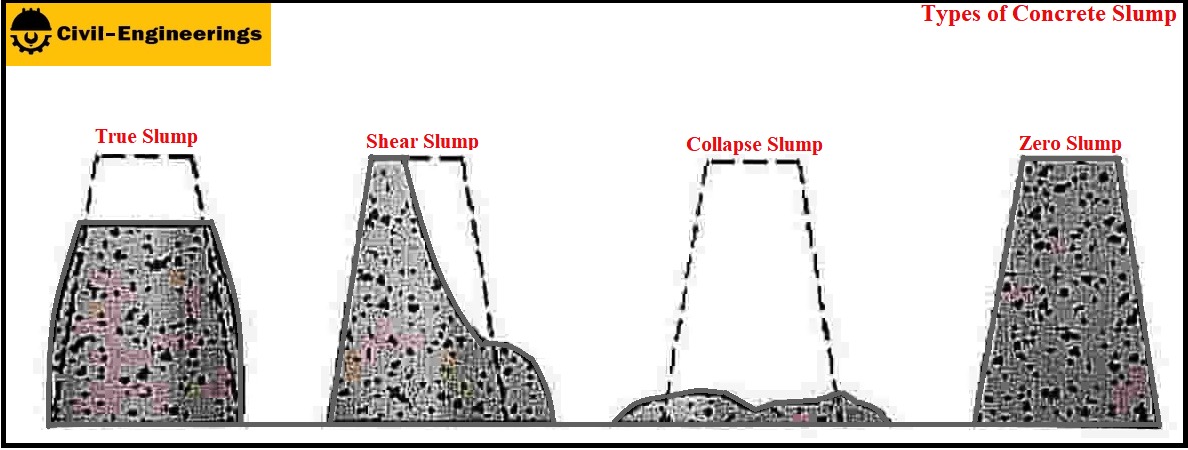
Types of slump:
After removal of cone, concrete takes various shapes and these different shapes called types of slump. According to the shape of concrete after cone removal slump is distributed in following four types of slump:
- Collapse Slump
In a collapse slump, the concrete collapses completely. Collapse slump shows the excessive quantity of water in the concrete. By reducing the quantity of water, collapse slump should be controlled. Concrete with collapse slump should not be used in any case.
- Shear Slump
In a shear slump, the concrete shears off and slips sideways. The shear slump shows the result is incomplete, and the test should be done again. If the shear slump continues, as may be the case with harsh mixes, this is an indication of the lack of cohesion of the mix.
- True Slump
In the case of true slump, the concrete simply subsides, keeping more or less to shape. This is the only slump which is used for concreting.
- Zero Slump
If concrete shows no change in its shape, defined as zero slump. Zero slump shows the very low ratio of water in the concrete.
Recommended slump for slab, column, beam and footing etc
| Type of Construction | Max Slump (mm) | Min Slump (mm) |
|---|---|---|
| Reinforced Foundation Walls and Footings | 75 | 25 |
| Plain Footings, Caissons, and Substructure Walls | 75 | 25 |
| Beams and Reinforced Walls | 100 | 25 |
| Building Columns | 100 | 25 |
| Pavements and Slabs | 75 | 25 |
| Mass Concrete | 75 | 25 |
Conclusion
Conduct the slump test as soon as possible after sampling the concrete to ensure accurate results. Recommended slump range should be followed to achieve the desired strength of the concrete structure.